Signup for artists program
The Echo music & podcast app puts our powerful software in your pocket. It allows you to keep updated with new podcast and music, all with the convenient factor of being able enjoy new episode or track from your favorite artists wherever you are in the world.
Dashboard
The “dashboard” is the first part you will encounter in the artist user panel and it provides you with comprehensive and complete information about your activity.
Dashboard
Welcome to the Echo Artists Program dashboard! This powerful tool is designed to help you manage your account, access valuable insights, and maximize your potential as an artist. In this section, we'll walk you through the key features and functionalities of the dashboard, empowering you to take control of your music or podcasting journey.
The Dashboard serves as your central hub for managing and monitoring your artist account on Echo Music & Podcast. It offers a user-friendly interface that presents key information and actions at a glance, allowing you to stay connected with your audience and optimize your content effectively.
Performance & Analytics
Depending on your field of activity, you can see the number of music tracks, podcast episodes, albums, seasons, and finally, the videos you published on the platform.
Key Features:
Performance Metrics:
Get a comprehensive view of your music or podcast's performance. Tracks metrics such as total music you have uploaded in the Echo platform and engagement levels. Use this data to measure your success and make informed decisions.
Insights and Analytics:
Dive deep into detailed analytics and insights to gain a deeper understanding of your audience. Explore trends, listener behavior, and geographical distribution. Use these insights to tailor your content strategy and grow your fan base.
By utilizing the Dashboard effectively, you can harness the full potential of the Echo Artists Program, optimize your content, and engage with your audience in a meaningful way. Take advantage of the tools and insights at your disposal to drive your artist career forward.
Tracks
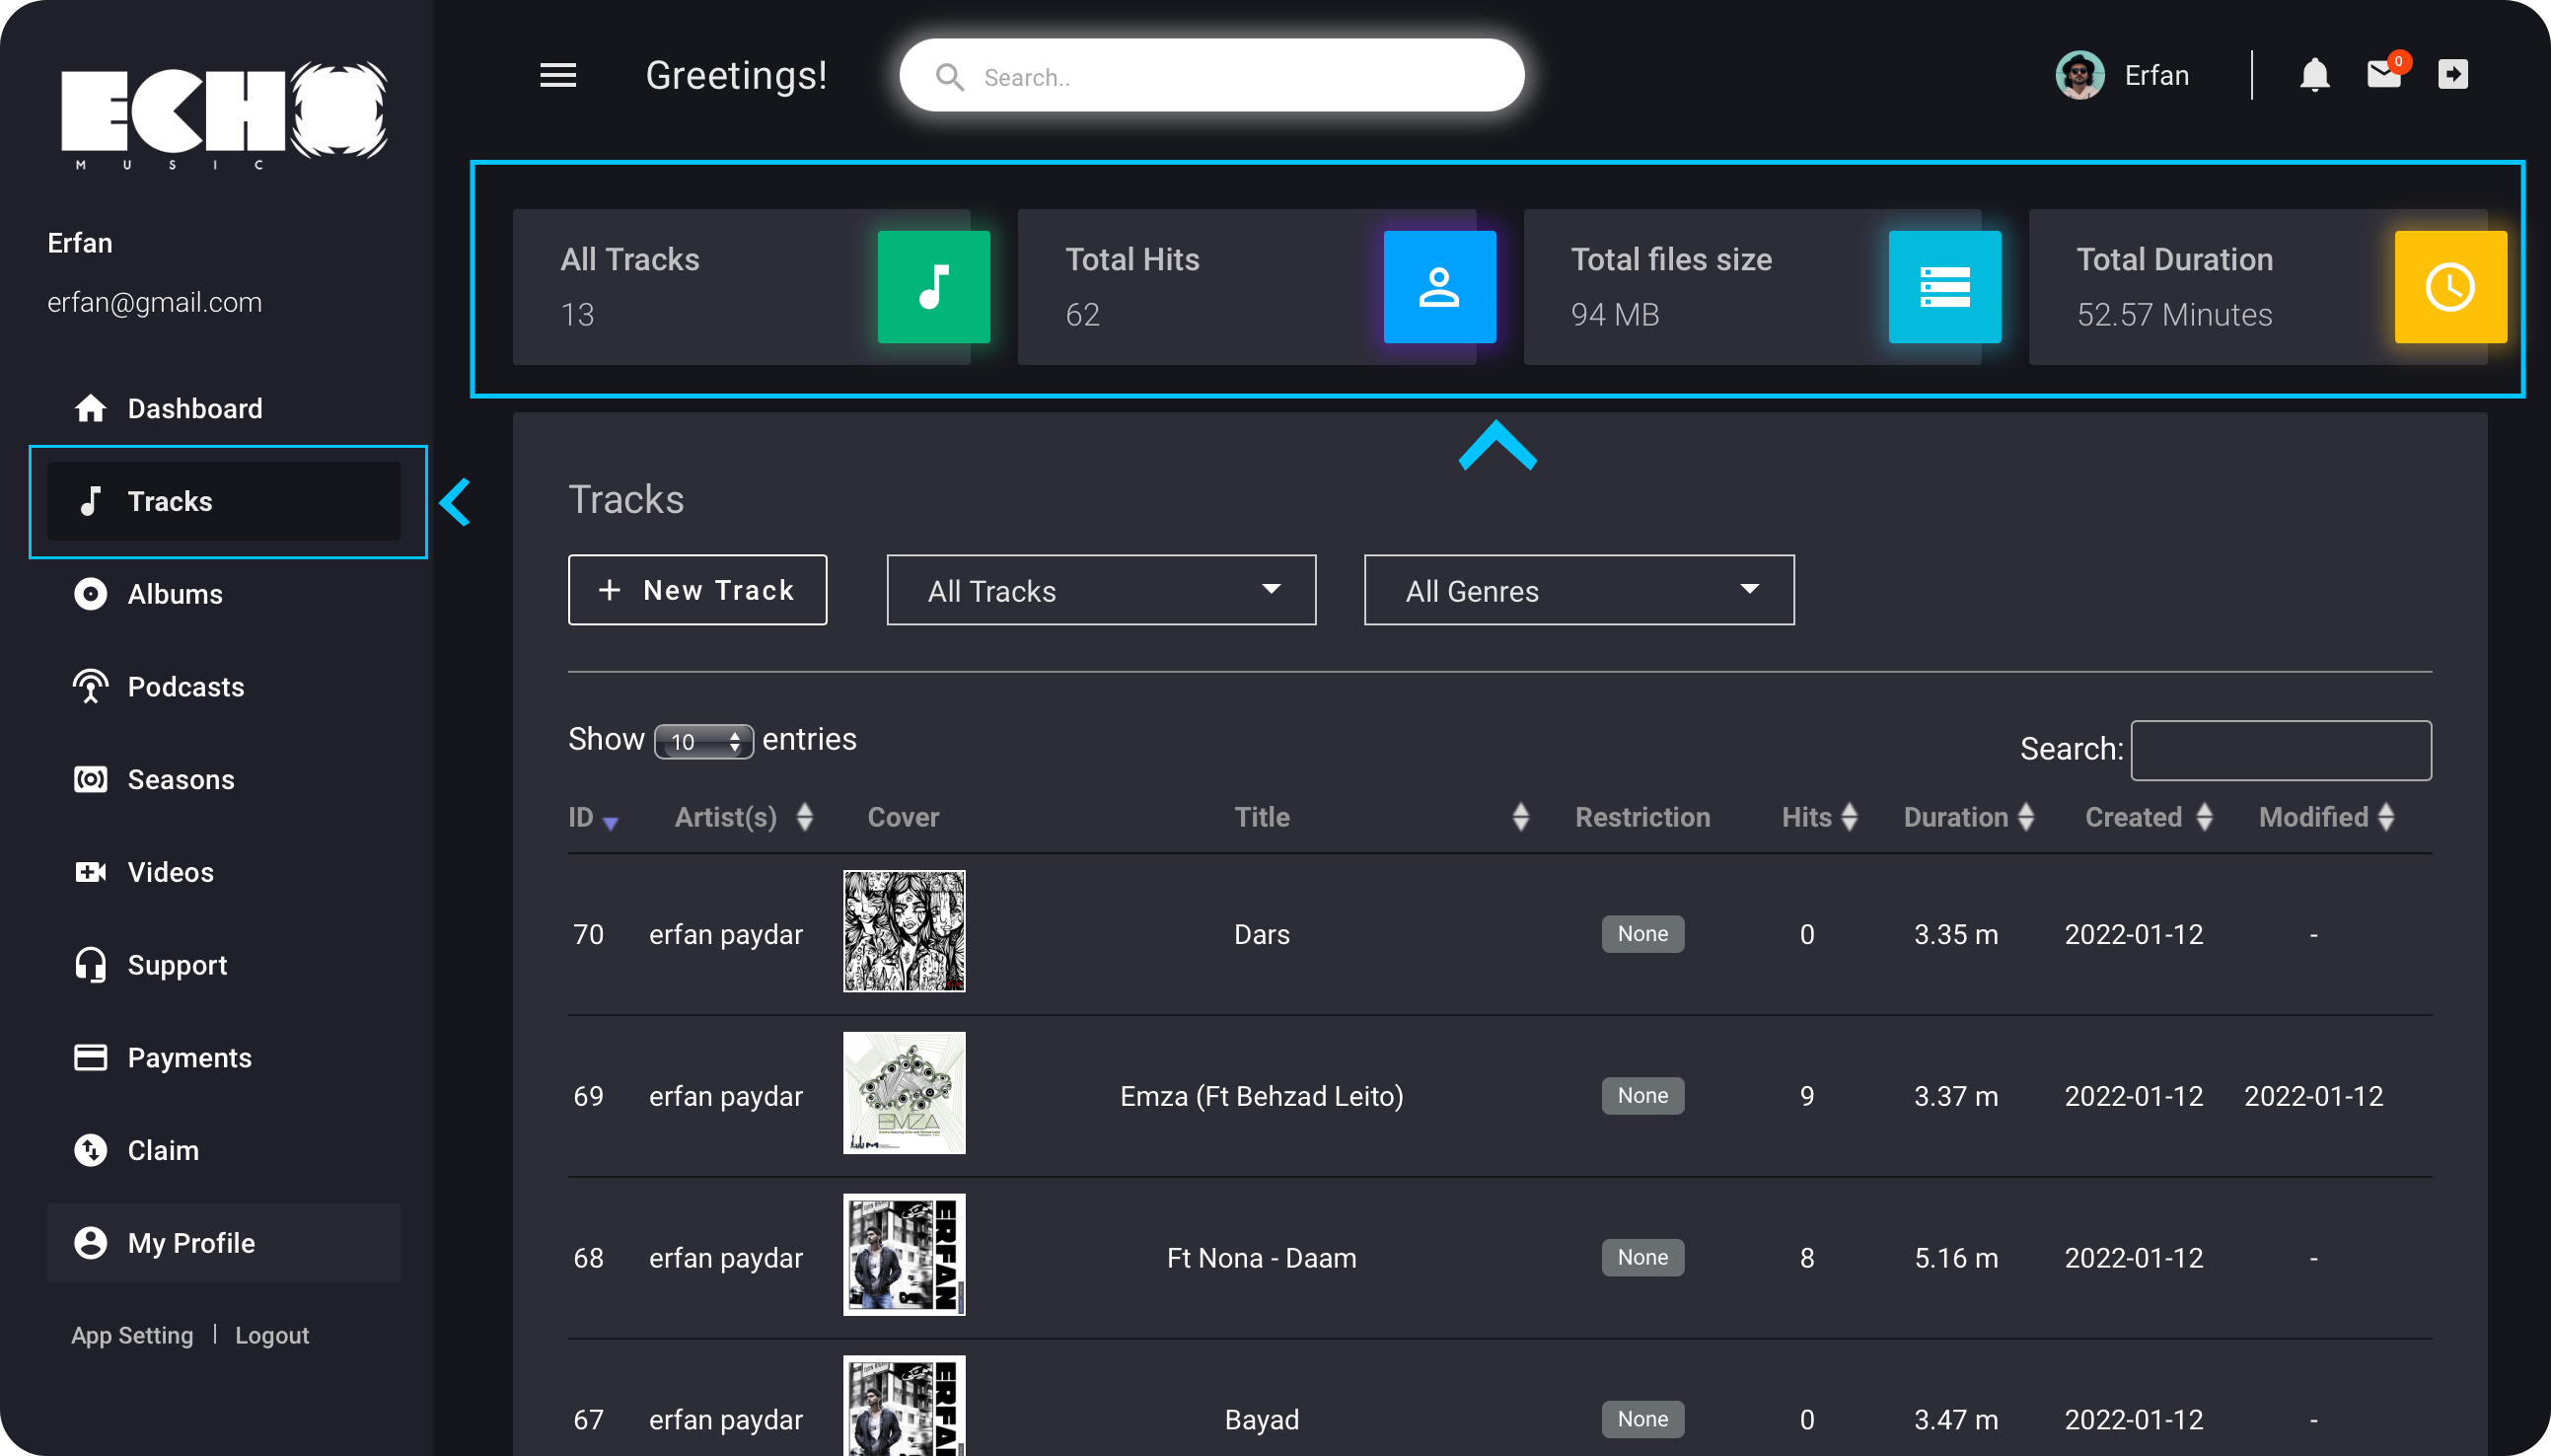
When you intend to upload a music track, you can upload a new track by entering this section. Also, you can access and manage any track you publish through this section. At the top of the page, general statistics of “All Tracks” “Total Hits” Total files size” and “Total Duration” are presented to you.
Tracks Analytics
The Tracks section is your gateway to managing your music uploads. Whether you want to upload a new track or access and manage previously published tracks, this section is where you can take full control. At the top of the page, you'll find general statistics such as "All Tracks," "Total Hits," "Total File Size," and "Total Duration," providing you with a quick overview of your music library.
New track
Clicking on the "New Track" option opens a dedicated page where you can publish your latest song. Fill in the required fields to complete the upload process. If desired, you can also enter the music text on the second page.
Please note that filling all the fields on the first page is mandatory for successfully uploading your music.
Step by Step:
To upload your new track, follow these steps:
- Upload a cover image for your music (maximum allowable size: 2000px).
- Upload the audio file (Allowed file types: mp3, wav, m4a, aac, and flac).
- Choose the genre that best represents your track.
- Enter the name of your track in the Title section.
Optional Options:
- Optionally, select a release date for your track.
- Add Lyrics for your track to provide listeners with the complete experience.
- Write a detailed description for your track, capturing its essence and giving your audience more context and insights.
Edit & Delete Tracks
Edit Track:
In the information section of each track, you will notice an icon resembling (
 ). Clicking on this icon enables you to edit all the track's information or choose to unpublish it. This gives you the flexibility to update track details as needed or remove tracks from public availability.
Delete Track:
Similarly, in the information section of each track, you will find an icon resembling (
 ). Clicking on this icon allows you to delete the selected track entirely from your library. Exercise caution while using this feature, as deleted tracks cannot be recovered.
Album
When you intend to create a music album, you can create your music album by entering this section. You can access and manage any album you create through this section. At the top of the page, general statistics of “All albums”, “Total hits” and “Total tracks in albums” are presented to you.
Albums
The Albums section is where you can create and manage your music albums. Whether you're looking to curate a collection of tracks or organize your releases, this section provides the necessary tools. At the top of the page, you'll find general statistics such as "All Albums," "Total Hits," and "Total Tracks in Albums," giving you an overview of your album library.
New Album
By selecting the "New Album" option, you can create your own album by handpicking published tracks and adding them to the album list. Complete the required fields to finalize the album creation process.
Step by Step:
To create your new Album, follow these steps:
- Upload a cover image for your Album (maximum allowable size: 2000px).
- Enter the name of your Album in the Title section.
- Drag and Drop your track from available track list To the album list:
Optional Options:
- Optionally, select a release date for your Album.
- Write a detailed description for your tracks, capturing its essence and giving your audience more context and insights.
Modify or Delete your album
Modify Album:
In the information section of each album, you will notice an icon resembling (
 ). Clicking on this icon enables you to edit all album's information or choose to unpublish it.
Delete Track:
Similarly, in the information section of each album, you will find an icon resembling (
 ). Clicking on this icon allows you to delete the selected album entirely from your library.
Note:
While using the delete album feature, it's important to remember that removing an album will not damage or delete the individual tracks within that album. The tracks will remain intact and accessible, even after the album is deleted. This ensures that your music remains preserved and accessible for future use or inclusion in other albums.
Podcast
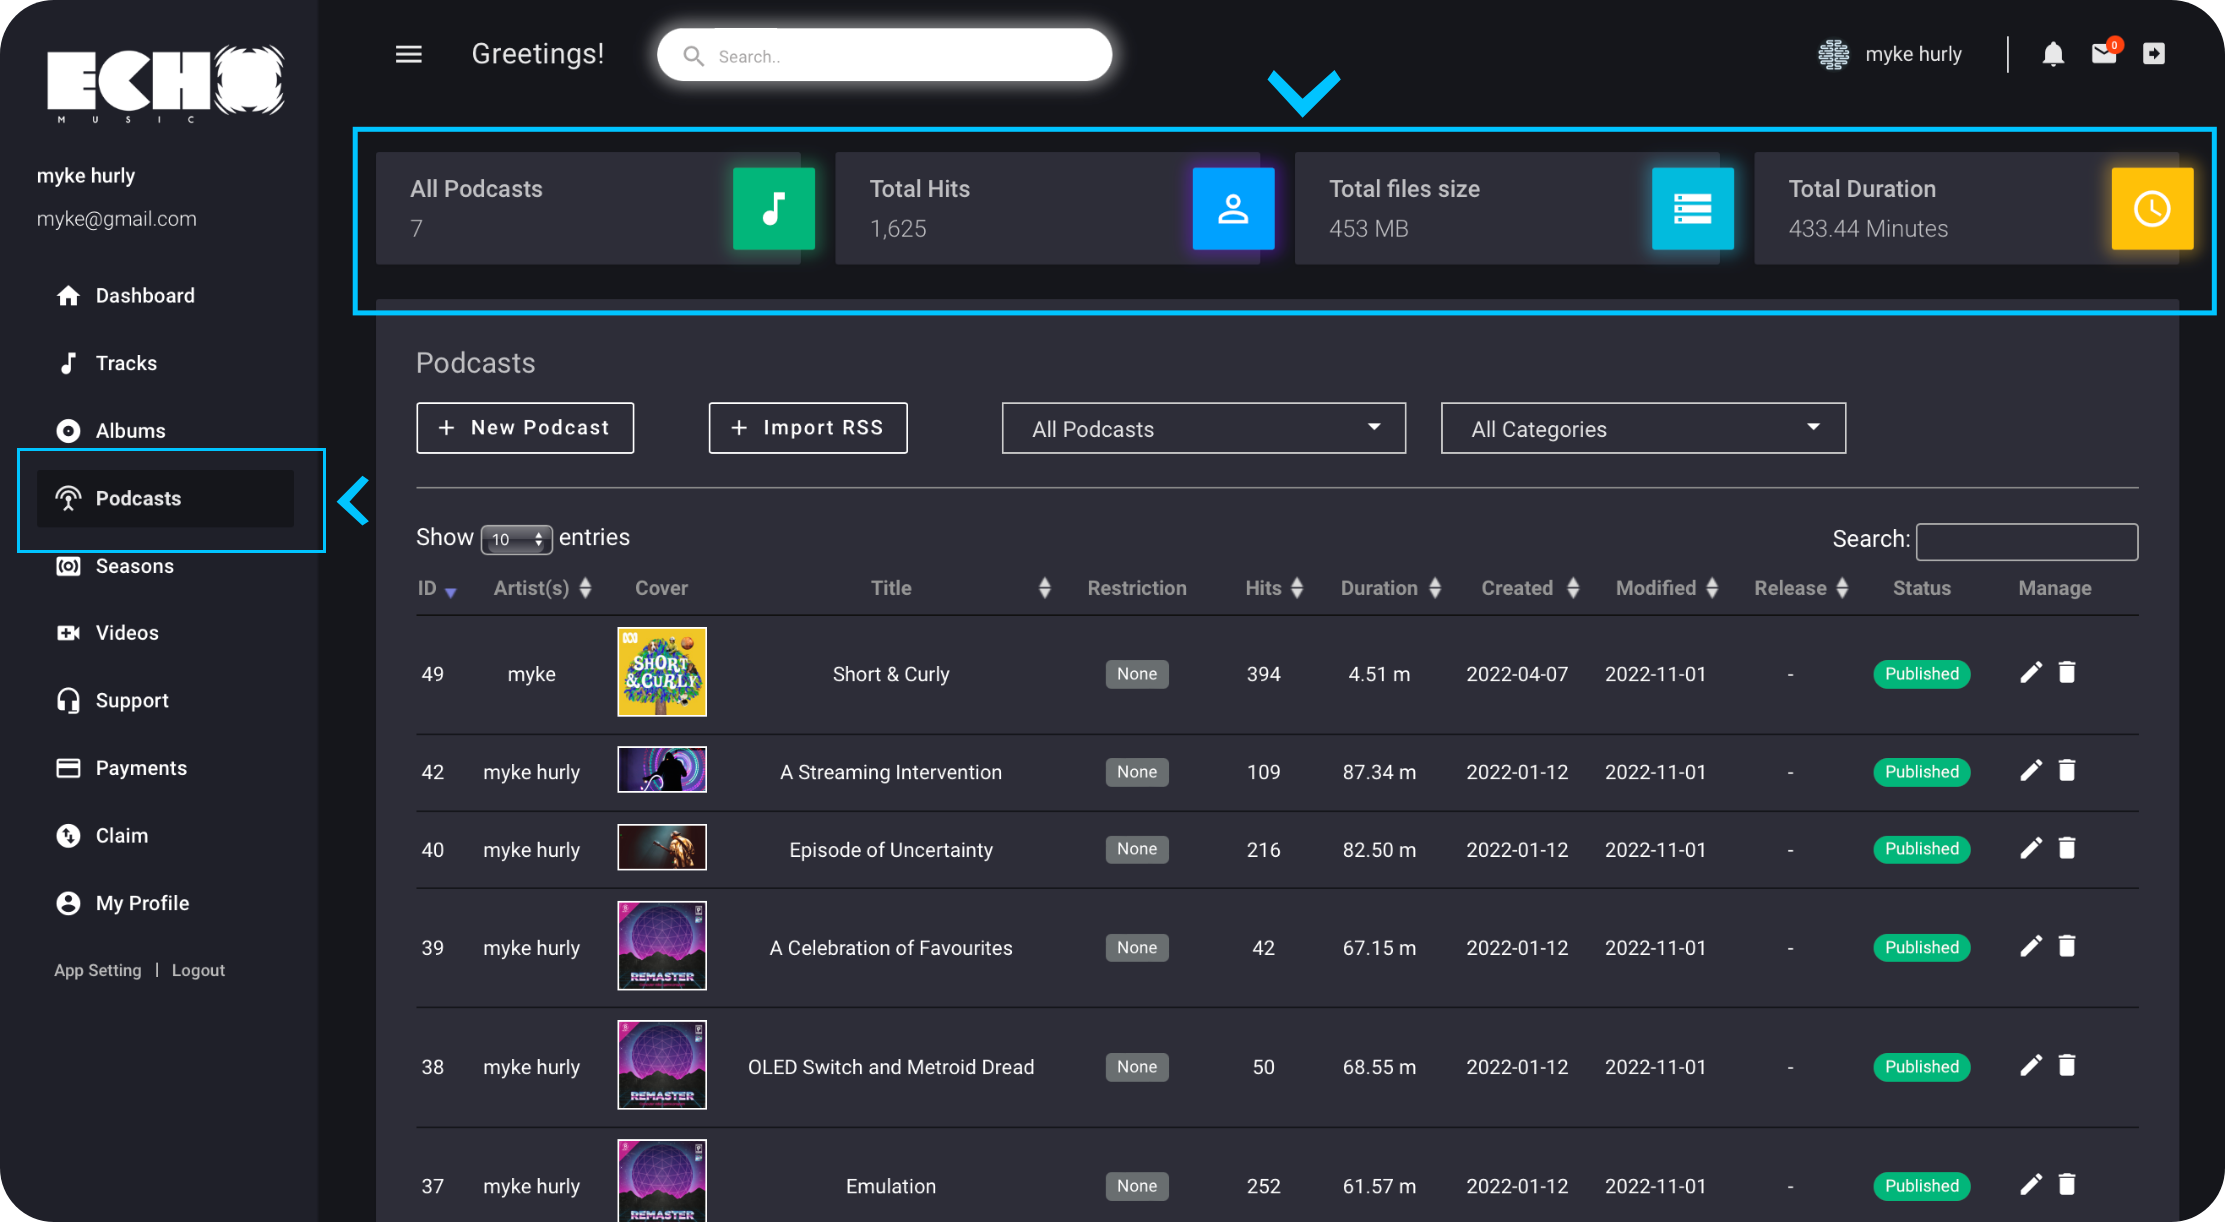
When you intend to upload a podcast episode, you can upload a new episode by entering this section. You can access and manage any episode you publish through this section. At the top of the page, general statistics of “All Podcasts”, “Total Hits”, “Total files size” and “Total Duration” are presented to you.
Podcast
The Podcast section allows you to upload and manage your podcast episodes. Whether you're sharing insightful conversations or captivating stories, this section provides the necessary tools for podcast management. At the top of the page, you'll find general statistics such as "All Podcasts," "Total Hits," "Total File Size," and "Total Duration," providing you with an overview of your podcast library.
New podcast
Clicking on the "New Podcast" option opens a dedicated page where you can publish your new episode by completing the required fields. It is important to fill in all the fields on the first page to successfully publish your podcast.
Step by Step:
To upload your new podcast episode, follow these steps:
- Upload a cover image for your episode (maximum allowable size: 2000px).
- Upload the audio file (Allowed file types: mp3, wav, m4a, aac, and flac).
- Choose the category that best represents your podcast.
- Enter the name of your episode in the Title section.
- Add an age restriction for your audience, if applicable.
Optional Options:
Additionally, you can take advantage of the following optional options:
- Select a release date for your episode to schedule its availability.
- Write a detailed description for your episode, capturing its essence and giving your audience more context and insights.
Import RSS Feed
If you want to add your podcast through the rss feed on the platform, you can import it by clicking on this section and verifying your link with the platform. This allows you to publish your podcasts via the RSS feed on the Echo music platform.
step by step:
- Click on Rss feed button.
- Enter your Rss feed link.
- When you submit the RSS feed for the check, an email will be sent to you that you have to verify your RSS feed and confirm.
when your RSS is verified, you can see the information of your podcast and by selecting the podcast category and clicking the confirm option, your RSS feed is ready to import.
Important Note:
Please note that when you import your podcast RSS feed, the Echo music platform only receives the feed data into its database. We do not send analytics and data to other platforms. Your podcast's performance and statistics will be specific to the Echo platform
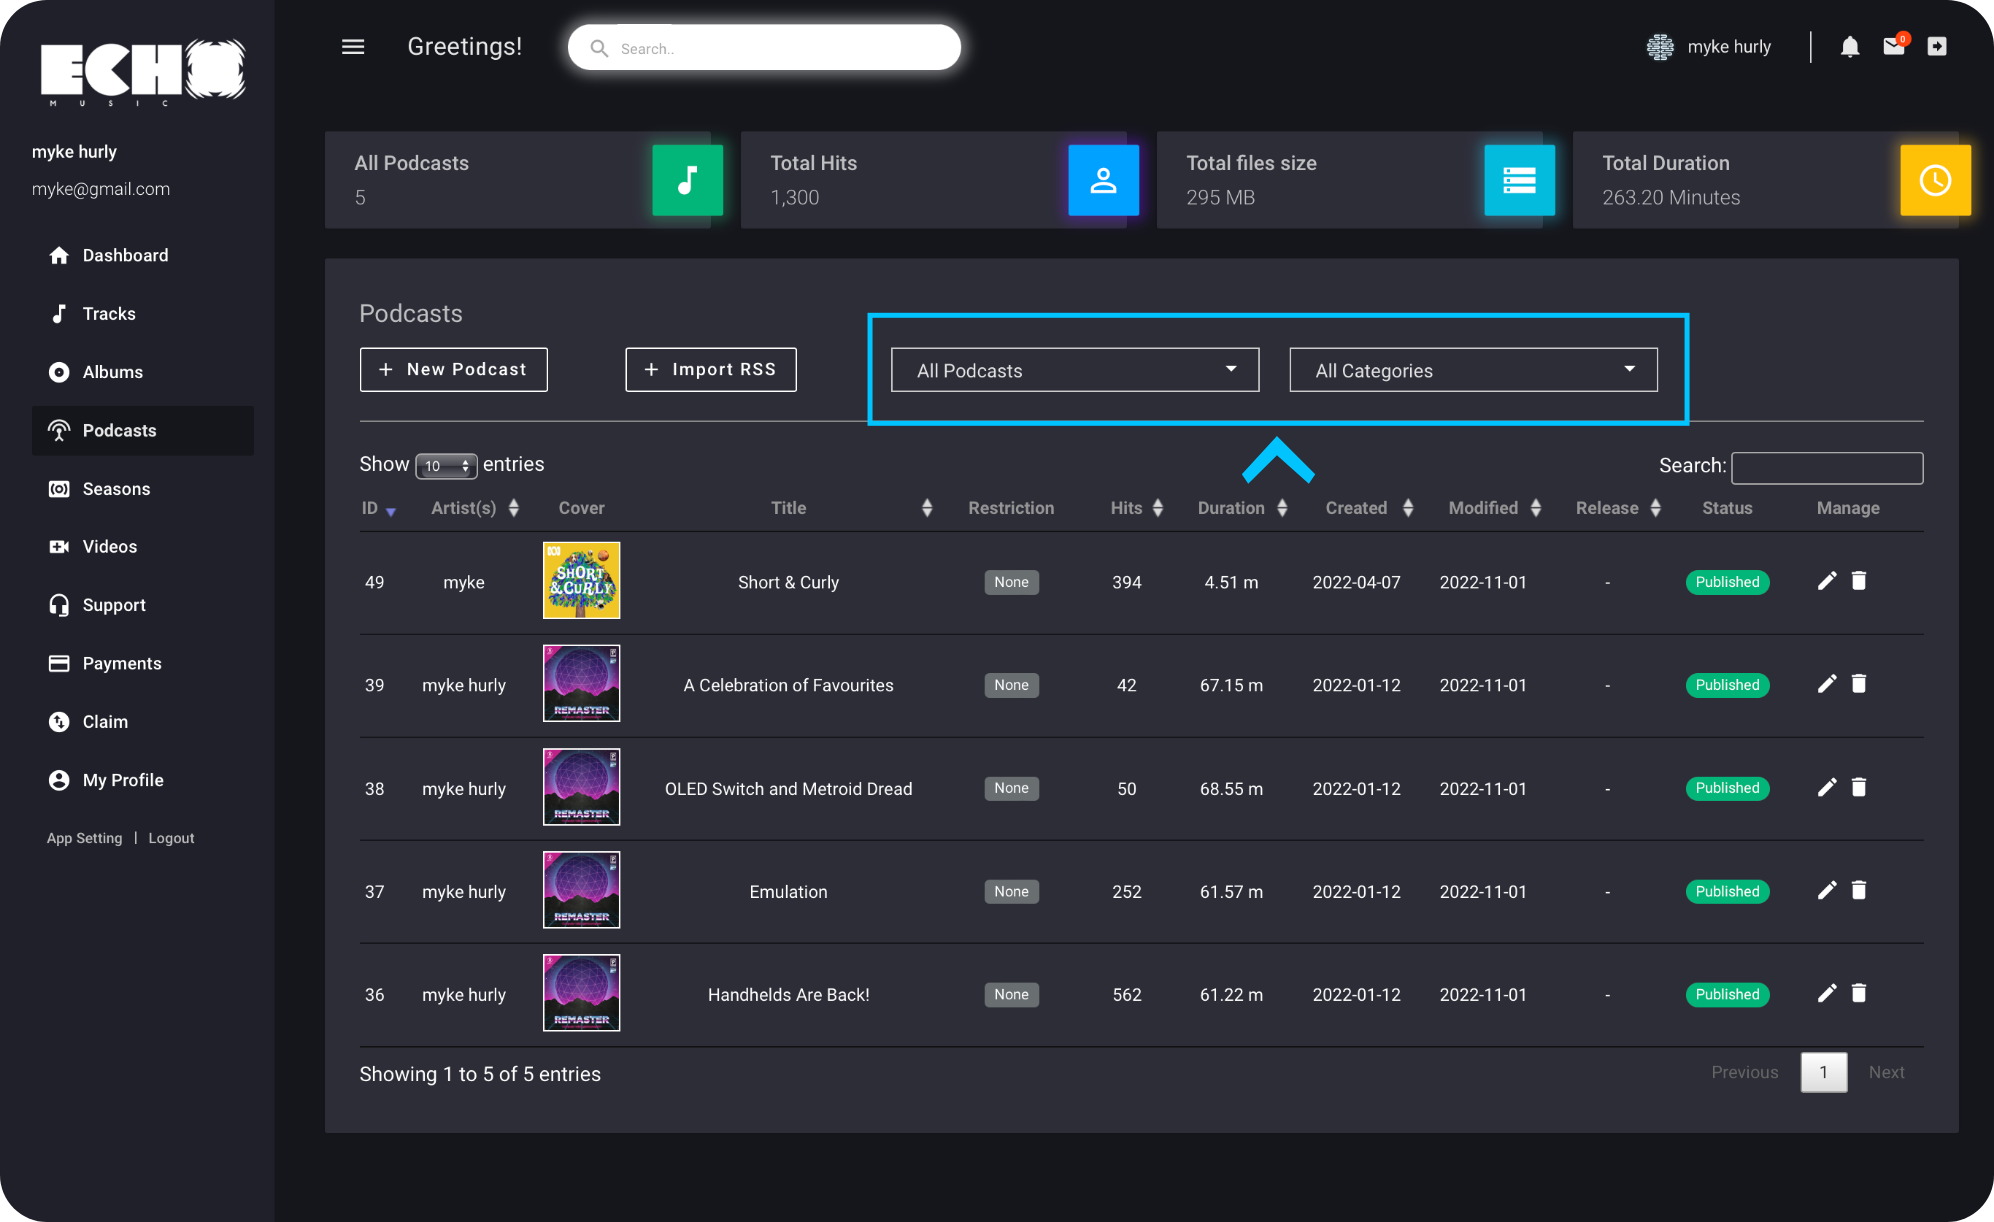
All podcast & All categories
All podcast:
This option gives you this possibility if you have seasoned your podcasts
You can filter your seasons from this section and see their information, manage and edit them
All categories:
If you have podcasts in other categories, through this section you can filter your podcasts in other categories and see their information, manage and edit them.
Modify & delete your episodes
Edit episode:
In the information section of each episode, you will notice an icon resembling ( ). Clicking on this icon enables you to edit all the episode's information or choose to unpublish it.
Delete episode:
Similarly, in the information section of each episode, you will find an icon resembling ( ). Clicking on this icon allows you to delete the selected episode entirely from your library. Exercise caution while using this feature, as deleted episode cannot be recovered.
Season
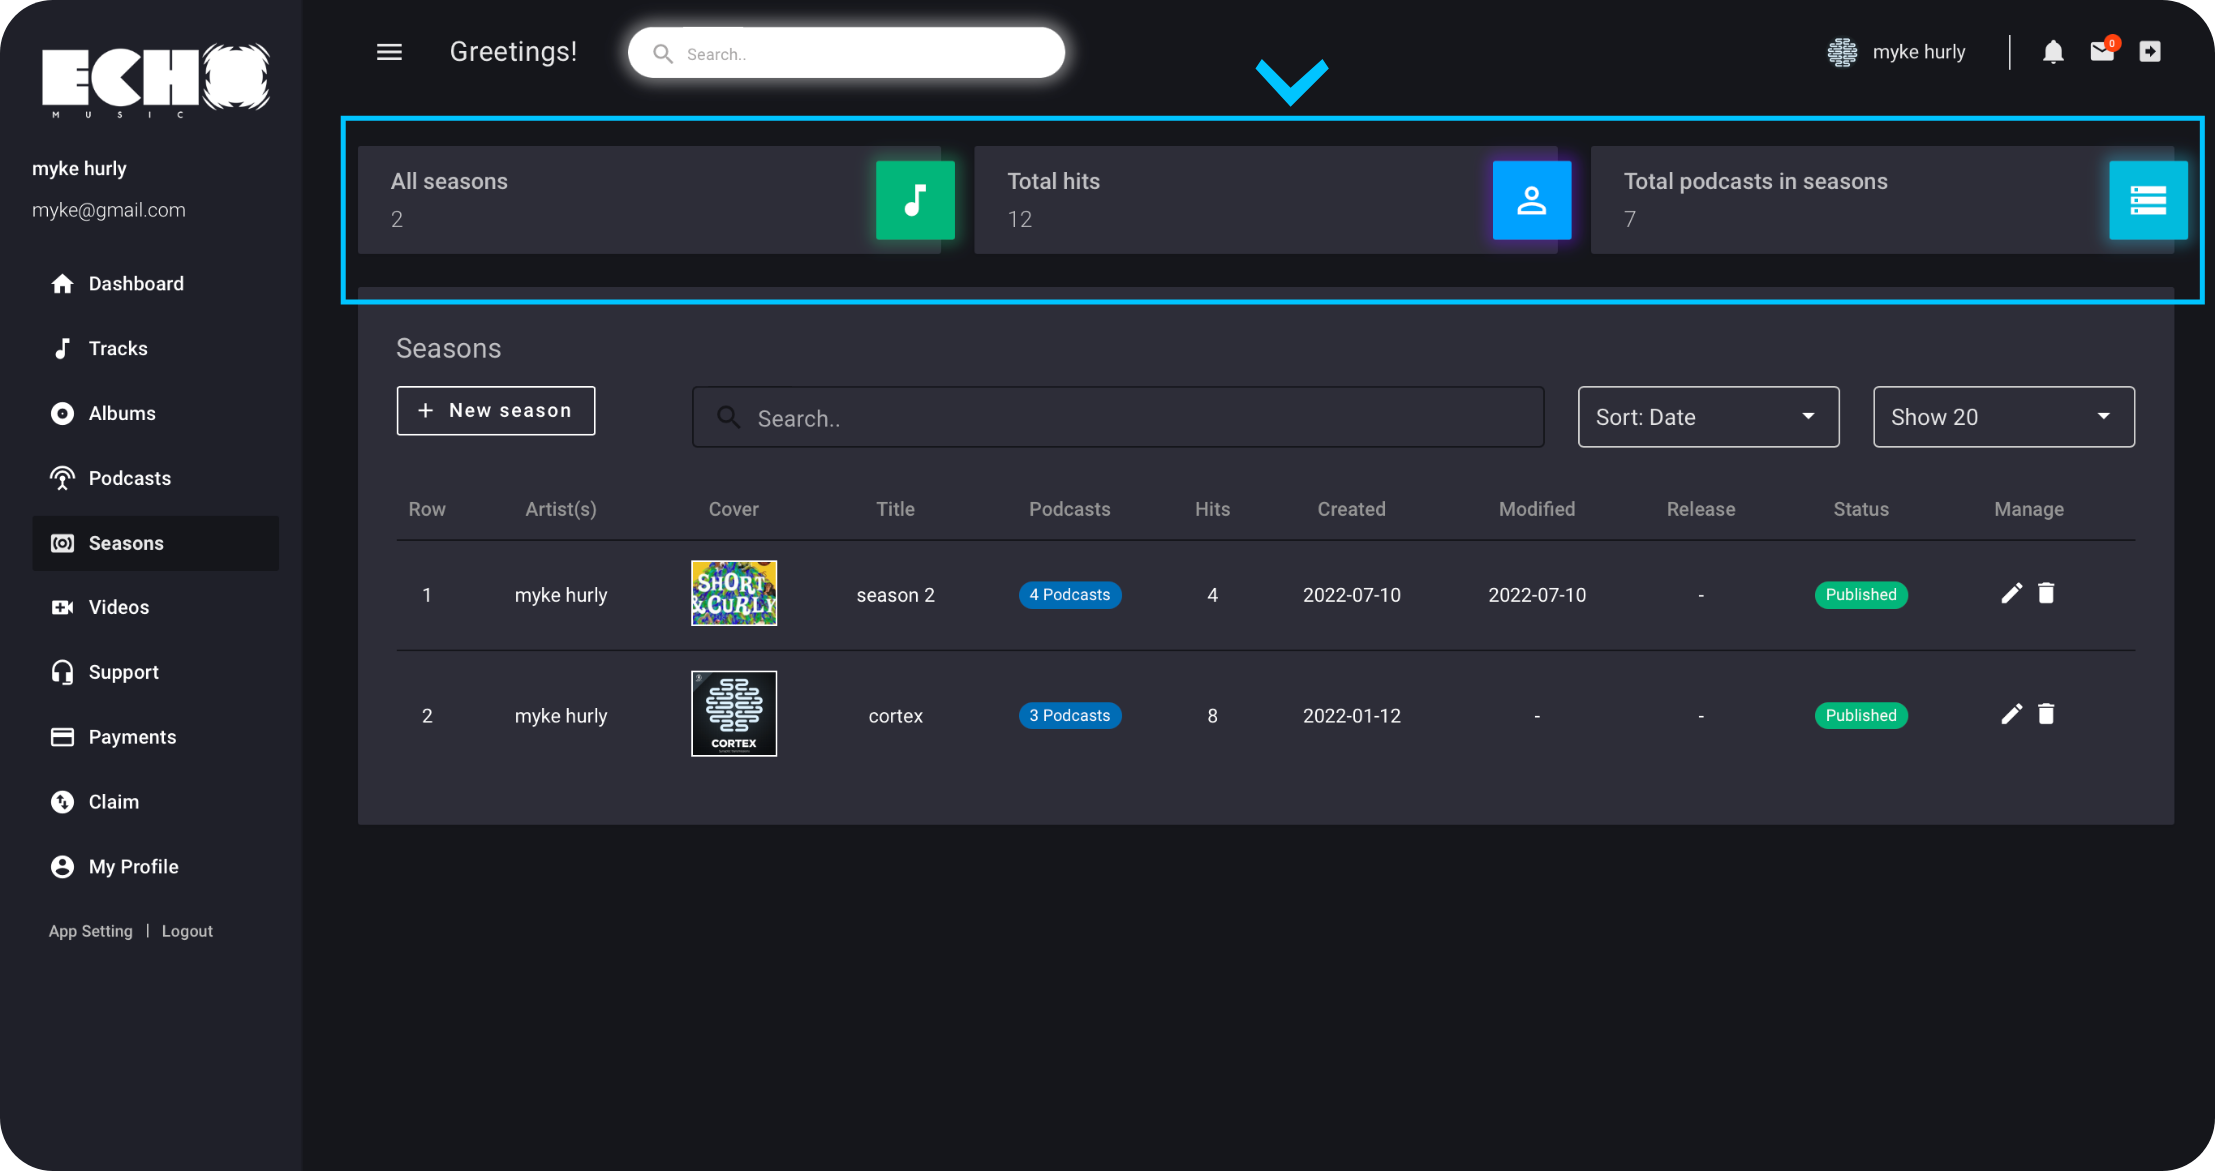
When you intend to create a Season for your podcast, you can create your podcast Season by entering this section. You can access and manage any Season you create through this section. At the top of the page, general statistics of “All seasons” “Total hits” “Total podcasts in seasons” are presented to you.
Season
In this section, you will see three items at the top of the page;
which shows you the total number of seasons, the total number of hits and the total number of podcasts.
Also, with the sort option, you can filter based on date, title, hit, and duration, and with the show option, you can filter the number of season you want to be shown on one page.
New season
By selecting the "New Season" option, you can create your own season by handpicking published episodes and adding them to the season list. Complete the required fields to finalize the album creation process.
Step by Step:
To create your new Season, follow these steps:
Upload a cover image for your Season (maximum allowable size: 2000px).
Enter the name of your Season in the Title section.
Drag and Drop your episodes from available episodes list To the season list:
Optional Options:
Optionally, select a release date for your Season.
Write a detailed description for your episodes, capturing its essence and giving your audience more context and insights.
Modify & Delete your season
Edit Season:
In the information section of each Season, you will notice an icon resembling ( ). Clicking on this icon enables you to edit all the Season's information or choose to unpublish it.
Delete Season:
Similarly, in the information section of each Season, you will find an icon resembling ( ). Clicking on this icon allows you to delete the selected Season entirely from your library.
Note:
While using the delete Season feature, it's important to remember that removing an Season will not damage or delete the individual episodes within that Season. The episodes will remain intact and accessible, even after the Season is deleted. This ensures that your podcast remains preserved and accessible for future use or inclusion in other Season.
Video
When you intend to upload a video, you can upload a video by entering this section. You can access and manage any video you publish through this section. At the top of the page, general statistics of “All Videos” “Total Hits” “Total files size” and “Total Duration” are presented to you.
Videos
When you intend to upload a video, you can upload a video by entering this section. You can access and manage any video you publish through this section. At the top of the page, general statistics of "All Videos" "Total Hits" "Total files size" and "Total Duration" are presented to you.
new video
By clicking on the "New Video" option, a page will open for you to publish your video by completing its fields (you need to know that filling all the fields is required to publish your podcast)
Sort
The 'sort' option allows you to sort your published videos by "date" "title" "hits" "duration" for better management.
Show
The 'show' option allows you to specify how many videos you want it to show you.
modify video
In the information section of each video you will see a sign similar (let's have the element in the output) when you click on it. You can edit all video information Or unpublish.
delete video
In the information section of each video, you will see a sign similar to (let's have the element in the output) when you click on it. You can delete your video.
Support
In this section, you can contact the support of Echo Music platform And raise your possible problems and challenges here.
In the first view, you will see the statistics of “All Tickets” “Open Tickets” “Pending Tickets” and “ Closed Tickets” and check the section of each.
Support
In this section, you can contact the support of Echo Music platform And raise your possible problems and challenges here.
In the first view, you will see the statistics of “All Tickets” “Open Tickets” “Pending Tickets” and “ Closed Tickets” and check the section of each.
New ticket
for send a ticket by "new ticket" option, first state the issue of your problem, Then select the relevant department, then describe your problems completely, and if you need to attach a file, attach it and click the "Add Ticket" option.
Claim
If you want from now on as the owner of the podcast, take over its full management.
You can apply for claim, by submitting the required documents and after being approved by the platform, you will have access to manage your own podcast.
Claim
Claiming Your Artist Profile on Echo Music & PodcastClaiming your artist profile on Echo Music & Podcast gives you complete control over your content, allows you to engage with your audience, and provides valuable insights to enhance your music or podcast. This guide will walk you through the step-by-step process of claiming your artist profile.
Step 1: Sign Up or Log In:
To claim your artist profile on Echo Music & Podcast, you'll need to sign up or log in to the platform. If you need to create Artists account follow the
link Here.
If you're new to Echo, download our app from the
App Store or
Google Play and create an account. If you're already a user, simply Log In using your existing credentials.
Step 2: Locating Your Profile:
Once you're logged in, navigate to the artist panel section. You can find this section in the main menu on the Left side. Look for the "Claim" option.
Step 3: Initiating the Claiming Process:
Within the artist panel, locate the "Claim" option. Click on it to search for your account name on the Echo platform. If you have multiple profiles you want to claim, you can add them all.
You may be prompted to provide additional information or documents to verify your identity and ownership of the content.
Please note that this revision clarifies the action of searching for the account name and adds a note about claiming multiple profiles. If you have any further questions or need additional assistance, feel free to email us at:
Info@echomusic.app!
Step 4: Send Request:
Once you send the request to our team, we will create a support ticket for you containing all the information you have provided. If you wish to add more information, you can do so, and we will be in touch if we require any further details.
Please note that this revision makes the language more concise and clarifies the actions taken after the request is sent. If you have any more questions or need further assistance, please let me know!
Step 5: Verification Process:
Follow the on-screen instructions to complete the verification process. This may include providing official identification documents, proof of ownership, or any other necessary information. Our team will review your submission, and the verification process will typically be completed within 5 business days.
To upload your documents and verify section follow the instructions:
Step 6: Customizing Your Profile:
Once your profile is verified and claimed, it's time to customize it. Access the artist panel and look for the "Profile Settings" or "Edit Profile" option. From there, you can update your bio, profile picture, social media links, and any other relevant information that will make your profile stand out.
Step 7: Managing Your Content:
As a verified artist on Echo Music & Podcast, you have full control over your content. Within the artist panel, you can upload, edit, and delete your music or podcast episodes. Ensure that your content meets our guidelines and policies to provide the best experience for your audience.
Step 8: Analytics and Insights:
Make the most of your artist profile by leveraging the analytics and insights available to you. In the artist panel, navigate to the "Analytics" or "Insights" section. Here, you'll find valuable data on listener demographics, play counts, engagement metrics, and more. Use these insights to understand your audience better and refine your music or podcast strategy.
Need Help?
If you encounter any issues or have questions regarding claiming your artist profile on Echo Music & Podcast, our support team is here to assist you. Reach out to our dedicated support channel at
Info@echomusic.app for prompt assistance.
By following these steps, you'll successfully claim your artist profile on Echo Music & Podcast and unlock a world of opportunities to showcase your talent and connect with your audience. Start today and take control of your music or podcast journey!

 ). Clicking on this icon enables you to edit all the track's information or choose to unpublish it. This gives you the flexibility to update track details as needed or remove tracks from public availability.
 ). Clicking on this icon allows you to delete the selected track entirely from your library. Exercise caution while using this feature, as deleted tracks cannot be recovered.
 ). Clicking on this icon enables you to edit all album's information or choose to unpublish it.
 ). Clicking on this icon allows you to delete the selected album entirely from your library.

 ). Clicking on this icon enables you to edit all the episode's information or choose to unpublish it.
 ). Clicking on this icon allows you to delete the selected episode entirely from your library. Exercise caution while using this feature, as deleted episode cannot be recovered.
 ). Clicking on this icon enables you to edit all the Season's information or choose to unpublish it.
 ). Clicking on this icon allows you to delete the selected Season entirely from your library.

